WellnessTastic is reader-supported. When you buy through links on this page, we may earn an affiliate commission at no extra cost to you. Learn more.
Is the air in your home actually clean? You cannot tell just by looking or smelling, because many common indoor pollutants are invisible and odorless. The good news is that you do not need a laboratory to find out. Learning how to test indoor air quality at home can be as simple as a room-by-room walkthrough, a low-cost humidity meter and an air quality monitor, with specific tests for hazards like radon.
This guide walks you through every option for home air quality testing, from free checks to professional testing, explains how to run your own simple tests, and tells you how often to check your indoor air. For background on what you are measuring, see our complete guide to indoor air quality.
Quick answer: To test indoor air quality at home, start with a visual and smell check, measure humidity with a hygrometer, use an indoor air quality monitor to track PM2.5, CO2 and VOCs for at least a week, test for radon with a dedicated kit, and install certified carbon monoxide alarms. Call a professional for suspected hidden mold, high radon or problems you cannot trace.
Why Test Your Indoor Air Quality?
Testing turns guesswork into facts. It helps you:
- Find out which pollutants are actually a problem in your home, instead of buying products you may not need.
- Spot invisible hazards such as radon and carbon monoxide.
- See how everyday activities like cooking, cleaning and sleeping with the door closed affect your air.
- Confirm whether changes such as a new filter, air purifier or better ventilation are working.
If you have already noticed clues like stale air, musty smells or condensation, our guide to the signs of poor indoor air quality will help you decide what to test first.
5 Ways to Test Indoor Air Quality at Home

There is no single indoor air quality test that measures everything. Instead, use a combination of methods, from simple and free to specialized.
Method 1: Do a room-by-room walkthrough (free)
Your senses are the first testing tool. Walk through every room, including the basement, attic, garage and laundry area, and look and smell for:
- Musty or damp odors
- Visible mold, water stains or peeling paint
- Condensation on windows
- Stuffy or stale air
- Chemical or fragrance smells
- Dust that builds up quickly
- Yellow or orange flames on gas appliances
This free check will not give you numbers, but it often reveals moisture problems and obvious pollution sources. Our printable indoor air quality checklist makes this step easy.
Method 2: Test humidity with a hygrometer (low cost)
Humidity is one of the most important and easiest measurements to take. A basic digital hygrometer costs very little and shows relative humidity and temperature. The EPA recommends keeping indoor humidity below 60%, ideally between about 30% and 50%.
- Place the hygrometer in different rooms for a day or two each, especially bedrooms, bathrooms and the basement.
- Check readings at different times, such as after showers, during cooking and overnight.
- Readings regularly above 60% suggest you need better ventilation or a dehumidifier.
- Readings below 30% in winter may mean the air is very dry.
Method 3: Use an indoor air quality monitor
An air quality monitor is the most practical way to test air quality in your home continuously. Depending on the model, it can measure fine particles (PM2.5), carbon dioxide (CO2), volatile organic compounds (VOCs), humidity and temperature, and some measure radon or formaldehyde.
Unlike a one-time test kit, a monitor shows how your air changes throughout the day, which is where most useful insights come from. Look for a monitor with a true NDIR CO2 sensor and a laser particle sensor. See our comparison of the best indoor air quality monitors for specific recommendations.
Method 4: Use specific test kits for hidden hazards
Some hazards need their own dedicated tests:
- Radon: use a short-term or long-term radon test kit, or a continuous radon monitor. Short-term tests take a few days; long-term tests (over 90 days) give a better picture of your year-round average. The EPA recommends fixing homes at or above 4 pCi/L. See the EPA radon page.
- Carbon monoxide: you do not “test” for CO with a kit. Instead, install certified CO alarms on every level of your home and near sleeping areas, and test them monthly with the test button.
- Lead: for homes built before 1978, use an EPA-recognized lead test kit on painted surfaces or hire a certified lead inspector before renovating.
- Formaldehyde: passive test badges sent to a lab, or a monitor with a formaldehyde sensor, can show whether levels are elevated after renovations or new furniture.
What about DIY mold test kits? Be cautious. The EPA notes that if you can see or smell mold, sampling is usually unnecessary; the priority is fixing the moisture and cleaning it up. Many DIY mold kits cannot tell you much, because mold spores are present almost everywhere at some level.
Method 5: Hire a professional indoor air quality tester
Professional testing uses calibrated equipment and, in some cases, laboratory analysis. It can be worthwhile when:
- You suspect hidden mold behind walls or under floors.
- Radon results are elevated and you need confirmation or mitigation.
- Someone in the home has ongoing symptoms and home checks have not found a cause.
- You are buying a home, especially an older one.
- You are planning renovations that may disturb lead paint or asbestos.
When hiring, look for relevant credentials. For radon, look for professionals certified through a recognized national radon proficiency program. For mold, ask about the inspector’s training and methods, and be wary of anyone who offers testing and expensive remediation without a clear moisture investigation.
How to Test for Specific Indoor Air Pollutants
Different pollutants need different testing approaches. This table shows what works best for each one.
| Pollutant | Best DIY test | When to use a professional | Notes |
|---|---|---|---|
| Humidity | Hygrometer or air quality monitor | Rarely needed | One of the most useful and cheapest measurements |
| CO2 | Monitor with NDIR sensor | Rarely needed | Best indicator of ventilation |
| PM2.5 | Monitor with laser particle sensor | Rarely needed | Great for tracking cooking and smoke |
| VOCs | Monitor with VOC sensor (index) | Lab analysis for specific chemicals | Consumer sensors show changes, not specific chemicals |
| Formaldehyde | Monitor with HCHO sensor or lab badge | After major renovations or strong odors | Levels often higher in new homes |
| Radon | Short-term or long-term test kit | Confirmation and mitigation | Only way to know is to test |
| Carbon monoxide | Certified CO alarms | Appliance inspection | Never rely on a general monitor |
| Mold | Visual and smell check, humidity | Hidden mold or large areas | Fix moisture first |
| Lead | EPA-recognized test kit | Before renovating older homes | Mainly a concern in homes built before 1978 |
For a deeper look at each of these pollutants and where they come from, read our guide to indoor air pollution.
Your Home Air Quality Testing Starter Kit
You do not need to buy everything at once. Build your home air quality testing kit in stages, starting with the essentials.
Essentials for every home
- Certified carbon monoxide alarms: one on every level and near sleeping areas. This is a safety requirement, not an optional extra.
- A radon test kit: an inexpensive one-time test that every home should do at least once.
- A digital hygrometer: the cheapest way to track humidity and spot moisture problems early.
Recommended next step
- A multi-sensor air quality monitor: adds PM2.5, CO2 and VOCs so you can see how daily activities affect your air. Our guide to the best indoor air quality monitors compares options at different price points.
Specialized extras
- A continuous radon monitor: useful in radon-prone areas or homes with finished basements.
- A formaldehyde monitor or lab badge: helpful after renovations or when buying lots of new furniture.
- An EPA-recognized lead test kit: for homes built before 1978, before any sanding or renovation work.
Start with the essentials, add a monitor when you are ready, and only buy specialized tests if your home or situation calls for them. This approach keeps costs down while still covering the most important risks.
How to Run Your Own Home Air Quality Test
Once you have a monitor, follow this simple testing process to get meaningful results.
Step 1: Record a baseline
Place your monitor in the room you use most and leave it for at least a week without changing your routine. This baseline shows your normal levels and daily patterns.
Step 2: Run activity tests
Next, watch what happens during specific activities:
- Cooking test: note PM2.5 before, during and after cooking, with and without the range hood running.
- Cleaning test: watch VOC readings when using cleaning products or air fresheners.
- Bedroom test: place the monitor in the bedroom overnight with the door closed, then again with it slightly open, and compare CO2 levels in the morning.
- Shower test: check humidity in the bathroom during and after showers, with and without the exhaust fan.
Step 3: Compare rooms
Move a portable monitor between rooms for a day or two each. Some rooms, such as basements or small bedrooms, often behave very differently from the rest of the home.
Step 4: Test your solutions
After making a change, test again. For example, you can run a simple “decay test” for an air purifier: after cooking raises PM2.5, turn the purifier on and note how quickly levels fall back to your baseline. Do the same on another day without the purifier and compare. This gives you a practical sense of how well it is working in your space.
Step 5: Keep notes
Write down what you did and what the readings showed. Patterns become much clearer over a few weeks, and notes make it easier to explain problems to a professional if needed.
How to Test Air Quality in Each Room
Each room has its own typical problems, so it helps to test them a little differently.
Bedroom
Focus on CO2 and humidity overnight. Leave the monitor near the bed but not right next to your face, and compare a night with the door closed to a night with the door or window slightly open. High CO2 in the morning is a sign the room needs more fresh air.
Kitchen
Focus on PM2.5 and VOCs during cooking. Place the monitor a few feet away from the stove, not directly above it. Compare readings with and without the range hood, and note how long it takes for levels to return to normal after cooking.
Bathroom
Focus on humidity. Check how high humidity climbs during a shower and how quickly it drops afterward with the exhaust fan running. If it stays high for a long time, the fan may be too weak or not venting properly.
Living room
This is a good place for your baseline test, since it is often the most used room. Watch for particle spikes from candles, fireplaces or vacuuming, and VOC spikes from cleaning products or air fresheners.
Basement
Focus on humidity and radon. Basements are often the dampest part of the home and the place where radon levels tend to be highest. Test humidity during both summer and winter, and place radon tests in the lowest lived-in level.
Home office
CO2 can build up quickly in a small, closed office. A CO2 monitor on your desk shows when it is time to open a window or take a break.
Nursery or children’s rooms
Focus on humidity, temperature and CO2, and keep the monitor out of reach. Use certified CO alarms nearby, and follow your pediatrician’s advice for any health concerns.
How to Read Your Test Results
| Measurement | Generally good | Worth attention | Typical next step |
|---|---|---|---|
| Humidity | About 30–50% | Above 60% or below 30% | Ventilate, dehumidify or humidify carefully |
| CO2 | Under about 800 ppm | Regularly above about 1,000 ppm | Increase fresh air |
| PM2.5 | Low and steady, with spikes clearing quickly | Long periods of elevated levels | Find sources, ventilate, filter |
| VOCs | Low and stable for your device | Frequent or long spikes | Identify products or activities; ventilate |
| Radon | Below 2 pCi/L | 4 pCi/L or higher | Retest and consider mitigation |
These are general guidelines for homes, not medical limits. Consumer monitors are best at showing trends and changes rather than exact values. For practical fixes for each problem, see our guide on how to improve indoor air quality.
What to Do If Your Test Results Are Bad
Poor results are useful: they tell you exactly where to focus. Work through them in this order:
- Deal with safety first: if a CO alarm sounds, leave the home and call 911. If radon is 4 pCi/L or higher, plan a follow-up test and mitigation.
- Fix moisture: repair leaks and bring humidity into the 30–50% range.
- Remove sources: cut back on fragrances, keep smoking outside and ventilate during cooking and cleaning.
- Improve ventilation: use exhaust fans and fresh air to lower CO2 and dilute pollutants.
- Add filtration: upgrade your HVAC filter and use a HEPA air purifier in problem rooms. See our best air purifiers guide.
- Retest: compare new readings with your baseline to confirm the improvement.
DIY Testing vs Professional Testing
| DIY testing | Professional testing | |
|---|---|---|
| Cost | Low, especially over time | Higher, per visit |
| What it measures | Humidity, CO2, PM2.5, VOCs, radon (with kits) | Can include lab analysis, hidden mold investigation, combustion testing |
| Best for | Ongoing monitoring and everyday problems | Specific concerns, confirmation and complex problems |
| Accuracy | Good for trends and changes | Calibrated equipment and lab methods |
| Speed | Continuous, real-time data | One-time snapshot, results may take days |
For most homes, DIY testing is the right place to start. It is affordable, continuous and shows you exactly how your daily habits affect your air. Professional testing is best used as a targeted next step when home tests point to a problem you cannot solve on your own.
How Often Should You Check Indoor Air Quality?
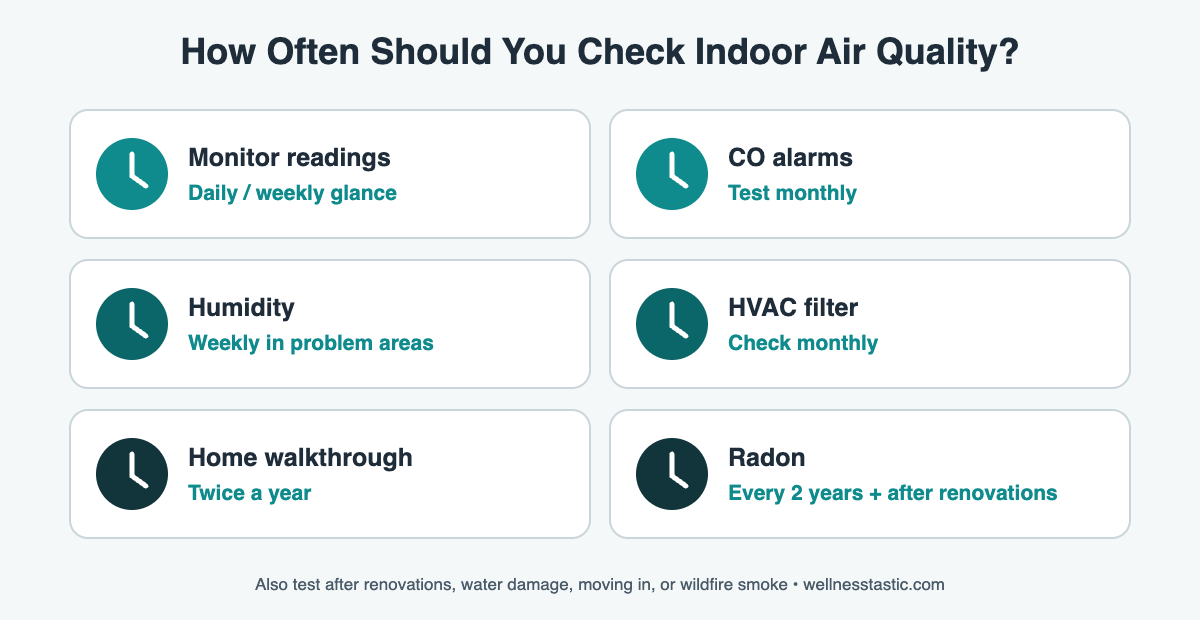
Indoor air changes with seasons, activities and even the weather, so testing is not a one-time job. Here is a practical schedule:
| What to check | How often |
|---|---|
| Air quality monitor readings | Continuously, with a quick look daily or weekly |
| Carbon monoxide alarms | Test monthly; replace according to the manufacturer |
| Humidity | Weekly in problem areas, and at each change of season |
| HVAC filter condition | Monthly |
| Room-by-room walkthrough | Twice a year, before summer and winter |
| Radon | Test at least once; many experts suggest retesting every two years and after major renovations or changes to the home |
| Professional testing | Only when home checks suggest a problem you cannot solve |
You should also check your indoor air quality whenever something changes: after renovations, painting or new flooring, when you move into a new home, after water damage, during wildfire smoke events, or when you notice new smells or symptoms.
Common Mistakes When Testing Indoor Air Quality
- Relying on a single reading: one number tells you very little. Look at patterns over days.
- Placing the monitor badly: keep it away from windows, vents, humidifiers and air purifiers, at roughly breathing height.
- Trusting “estimated CO2”: some cheap devices calculate CO2 from a VOC sensor instead of measuring it.
- Using a monitor instead of a CO alarm: always install certified CO alarms separately.
- Buying DIY mold kits first: find and fix moisture before spending money on mold sampling.
- Skipping radon: radon is common, invisible and only found by testing.
- Testing and not acting: results are only useful if you use them to make changes.
Frequently Asked Questions
Can I test indoor air quality myself?
Yes. Most homeowners can do a useful indoor air quality test with a walkthrough, a hygrometer, an air quality monitor, a radon test kit and CO alarms. Professional testing is mainly needed for suspected hidden mold, elevated radon, or problems you cannot trace.
What is the best indoor air quality testing kit?
There is no single kit that tests everything. For ongoing testing, a multi-sensor air quality monitor is the most useful tool. Add a dedicated radon test and certified CO alarms. See our list of the best indoor air quality monitors.
How long should I test indoor air quality?
Run a monitor for at least a week to establish a baseline, and ideally keep it running continuously. Short-term radon tests usually take a few days, while long-term radon tests run for more than 90 days.
Can my phone test air quality?
No. Phone apps can show outdoor air quality from local monitoring stations, which is useful for deciding when to open windows, but your phone cannot measure the air inside your home.
How much does professional indoor air quality testing cost?
Costs vary widely depending on your location, the size of your home and what is being tested. Radon and mold testing are often priced separately. Ask for a written quote that explains exactly what will be tested and how.
The Bottom Line
Testing indoor air quality at home is easier than most people think. Start with a free walkthrough, measure humidity, and use an air quality monitor to learn your home’s patterns. Test for radon, install CO alarms, and call in a professional only when you need to. Then use what you learn to make targeted improvements, and check again to confirm they worked.
Sources
- U.S. EPA: Care for Your Air, A Guide to Indoor Air Quality
- U.S. EPA: Radon
- U.S. EPA: A Brief Guide to Mold, Moisture and Your Home
This article is for general information only and is not a substitute for professional inspection or medical advice. See our Disclaimer and How We Research.